 Save
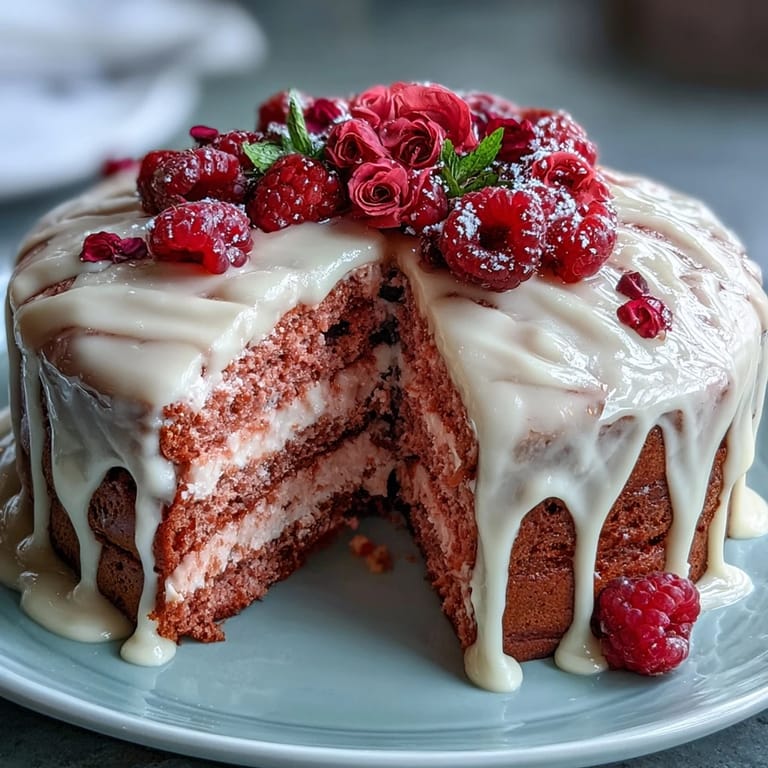
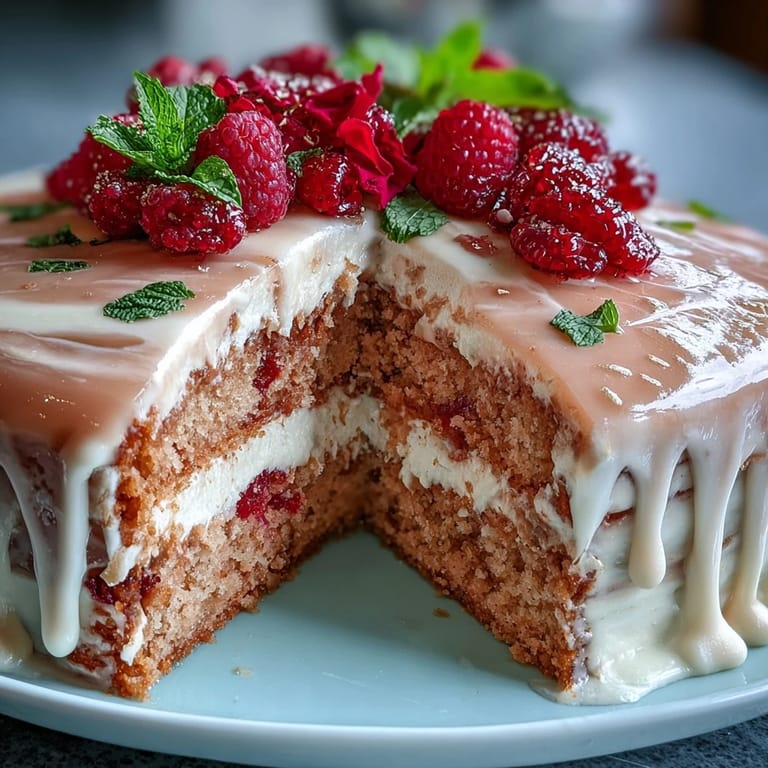
Save The first time I decided to bake this Rosé Velvet Cake, I was drawn by the idea of celebrating something beautiful—even if the occasion was just surviving a long Tuesday. The kitchen filled with the gentle aroma of rosé and vanilla, and, for a moment, it felt like there was music playing even though there was only the hum of my mixer. Whisking together rose-hued batter, I kept glancing toward my window at the shifting afternoon light. There is a certain quiet happiness in painting those gold drips that I never expected. Those blush-pink layers make any gathering feel a touch more magical.
When my cousin announced her engagement, I offered to bake the cake for her bridal shower, not realizing that every guest would huddle around the table, phones out, snapping photos before even thinking about dessert. There was a hilarious moment when someone tried to discreetly touch the gold drip — just to check if it was real gold. That afternoon, the entire cake disappeared, and I found frosting smudges on more than a few napkins and, somehow, a champagne flute. These are the stories that stick with you even after the plates have been cleared.
Ingredients
- All-purpose flour: This gives the cake its structure—be sure to spoon and level for accurate measuring and a tender crumb.
- Granulated sugar: Sweetness is key here, and creaming it properly with the butter makes for a soft, fluffy texture.
- Baking soda & baking powder: Both are needed for a good rise; double-check that they're fresh to keep the cake light.
- Salt: Don't skip it—even desserts need balance or they fall flat.
- Unsweetened cocoa powder: Just a hint provides depth and brings out the pink hue without overpowering the rosé.
- Unsalted butter: Using softened butter helps it whip up light; I let mine sit out overnight.
- Buttermilk: The secret to a tender, moist crumb; room temperature makes everything emulsify smoothly.
- Rosé wine: Adds the soft floral notes that make this cake unique—don't use anything you wouldn't drink.
- Eggs: Room temperature eggs give you even mixing (and less chance of curdling).
- Vanilla extract: It brings all the flavors together and softens the edges.
- White vinegar: Just a splash brightens the crumb and reacts with the baking soda for extra lift.
- Pink food coloring gel: A little goes a long way—gel is best for vibrant color without thinning the batter.
- Cream cheese: For the frosting, it brings tang and richness that pairs beautifully with rosé.
- Powdered sugar: Sifted for silly-smooth, cloudlike frosting (don't skip sifting or you'll risk lumps).
- Heavy cream: For the gold drip, it keeps the white chocolate pourable and luxurious.
- Edible gold luster dust and vodka/clear extract: These transform the drip into something fit for a celebration and dry quickly for a picture-perfect finish.
Tired of Takeout? 🥡
Get 10 meals you can make faster than delivery arrives. Seriously.
One email. No spam. Unsubscribe anytime.
Instructions
- Prep and preheat:
- Let's start by lining three 8-inch pans while your oven warms to 350°F. I love the sound of parchment paper smoothing into place—it gives me instant bakery vibes.
- Sift and blend dry ingredients:
- Whisk together flour, cocoa, baking soda, powder, and salt in a big bowl—watch that cocoa swirl into the flour like soft pink powder when you add the coloring later.
- Cream butter and sugar:
- Beat the butter and sugar until pale and cloudlike, about three minutes—if you pause, the mixer's gentle tapping is oddly soothing.
- Mix wet ingredients:
- Add eggs one at a time, then stir in vanilla; the batter turns silky before your eyes.
- Combine and color:
- Now pour in the buttermilk, rosé, and vinegar, alternating with the dry mix; it might look a bit streaky but trust in the process. Slowly swirl in pink gel until you reach that perfect bridal blush shade.
- Bake and cool:
- Divide the batter equally among the pans and bake; when you open the oven, you'll catch that gentle, floral scent. Let them cool in their pans briefly, then turn out onto wire racks to finish—resist the urge to frost until they're totally cool.
- Whip up frosting:
- Beat butter and cream cheese, then add the powdered sugar in two scoops to avoid a snowstorm. Once you add the rosé and vanilla, you'll notice the frosting goes billowy and fragrant.
- Layer and frost:
- Level the cakes if needed—no shame in using a serrated knife—then layer with frosting, crumb-coat, and chill before the final swirls. This step always feels like wrapping a present.
- Make the gold drip:
- Melt white chocolate and cream together in bursts; stir to dreamy smoothness and let cool before dripping over the frosted cake. This is the moment to let gravity do the work, letting perfect drips form naturally.
- Paint on the gold:
- Mix your luster dust with vodka or extract, then paint each drip with a food-safe brush. The transformation never fails to surprise me—each brushstroke shimmers in the light.
- Chill and serve:
- Give your masterpiece half an hour in the fridge so everything sets. Slice and watch those blush layers and golden drips steal the show.
 Save
Save During the clean-up after my last bridal shower cake, I caught my aunt quietly sneaking a second piece in the kitchen—her whispered grin made me realize this cake had become part of the celebration itself, not just dessert. Sometimes, it's those shared, stolen sweets that make the best memories.
Decorating Details That Make It Special
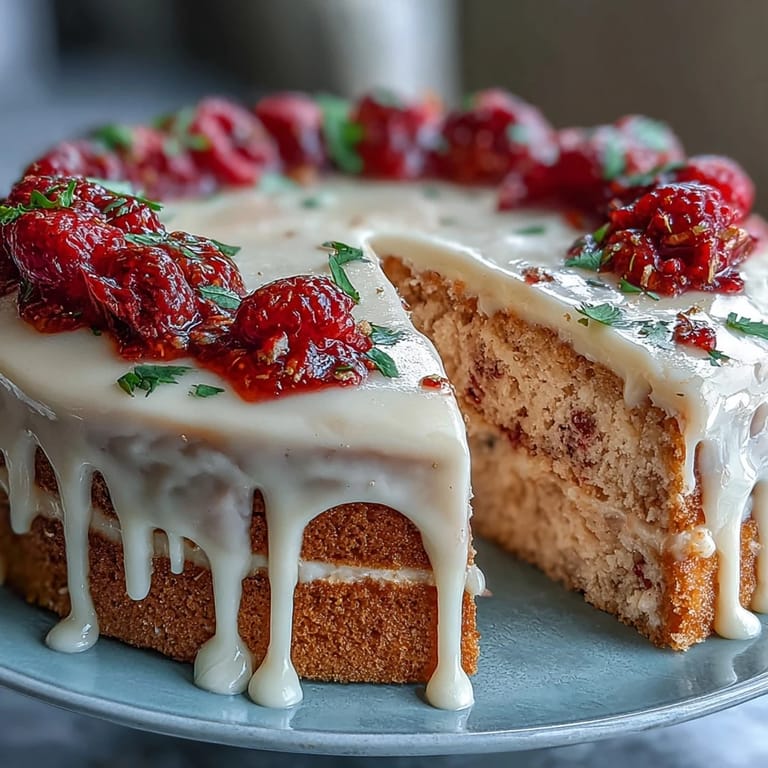
There's almost an art to draping edible gold over the white chocolate drip, and the shimmer transforms every slice into a centerpiece worthy of a celebration. Edible flowers or a scattering of fresh berries make the blush tones pop and add a little extra magic — just don't be surprised when this cake becomes the centerpiece of every Instagram story around the table.
Making It Your Own: Variations and Swaps
If you're baking for someone who avoids alcohol, substituting sparkling grape juice for the rosé is a simple, equally lovely swap. You can also infuse the frosting with a little lemon zest for a brighter twist or stencil on a few edible pearls for a vintage feel. One friend even added dried rose petals and said it made the cake feel like spring afternoon tea.
Troubleshooting for Home Bakers
If the layers turn out a bit uneven, don't stress—careful stacking and a crumb coat work wonders for camouflaging kitchen imperfections. And if the gold drip feels intimidating, remember the drips don't need to be perfectly uniform to look glorious under soft afternoon light. Cakes that lean slightly to one side always seem to get eaten first anyway.
- Make sure your pans are properly greased and lined for clean release.
- Chill the cake well before painting the gold, or your brush will smudge the chocolate.
- Don't skip sifting powdered sugar — lumps are no one's idea of glamour.
 Save
Save Celebrations big and small deserve a little sparkle, and this Rosé Velvet Cake is just the thing to bring friends close and memories even closer. You'll soon discover it's not just a cake—it's an invitation to savor every bite together.
Recipe FAQs
- → How can I intensify the rosé flavor?
Brush cooled layers with a little reserved rosé or fold an extra tablespoon into the frosting. If adding more liquid to the batter, reduce another wet element slightly to keep the crumb from becoming dense.
- → Can I make a non-alcoholic version?
Yes—replace rosé with sparkling grape juice or a concentrated grape reduction. Taste and adjust sweetness, and reduce other liquids slightly to maintain batter consistency.
- → How do I get an even blush color?
Use gel food coloring and add a small amount at a time, mixing thoroughly between additions. Gel keeps the batter from thinning; let the batter rest briefly so the color evens before baking.
- → What prevents the gold drip from running too far?
Cool the white-chocolate ganache to room temperature so it’s fluid but not hot, and chill the crumb-coated cake before dripping. Test on a chilled surface to dial in the right consistency.
- → How should I store the finished cake?
Keep the cake covered and refrigerated for up to 3 days. Remove from the fridge 30–60 minutes before serving to let flavors and texture soften.
- → Any allergen-friendly swaps?
Use dairy-free butter and cream cheese alternatives and a gluten-free flour blend to accommodate allergies. Choose white chocolate chips labeled free of soy if that is a concern.